Contents - Click a link to skip to the section you want to read

We know how you feel! Image by Ron Gessel.
Intro
There’s not many more annoying things than waking up one morning to find that you have no hot water or that your radiators are not performing as they should now that the weather is taking a definite turn for the worse.
Some of the central heating problems that you’ll encounter over the lifespan of a boiler will inevitably need to be looked at by a professional.
Having boiler insurance can offer great peace of mind, and we would never suggest that you try anything overly technical.
If you’ve got to take the cover off of the boiler, you should really be a Gas Safe registered engineer.
Thankfully, however, there are a few central heating problems that may seem disastrous at first glance, but really only take a little know-how to put right. Let’s take a look at few:
Common central heating problems
 No.1 – No hot water
This is pertinent to all of us, not just those who have UFH fitted. While it’s possible that there could be a need for more drastic action to be taken, going through this check-list before calling an engineer out might just save you the call-out fee – and the embarrassment too.
Check that there is power going to the boiler
As our boilers are generally hidden away from view it could just be that there has been an interruption in electricity getting to the unit.
Many people wrongly assume that a gas boiler runs solely on gas, but all those lights and digital displays are powered by electricity so take a look and make sure that they’re all on and working.
Check the thermostat
You may think that this is a ridiculous thing to say but it’s happened to multiple people in the past and it will inevitably happen to many more in the future. Maybe your partner read an article on energy efficiency and decided to turn it down, or it may even have been you who turned it off the night before and you just clean forgot in your 6am haze!
Whether it is the thermostat or not, it only takes a second to check. Better that you find it, than the engineer who’ll be giving you a funny look as he collects his cash.
Check the timer
This is a common problem for those who have mischievous children running around the house, but changes can also happen for a number of other reasons.
A powercut in the middle of the night, or something as simple as the clocks changing in the spring and autumn, can change a timers settings and leave you without hot water.
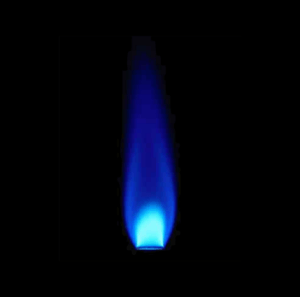 Check the pilot light
The first thing is to make sure that it is actually on. If it is, then it should be burning with a bright blue colour and it shouldn’t have any yellow or orange in it at all.
If your pilot light is showing any sign of these colours, switch off the boiler and call a Gas Safe registered engineer immediately as it could be that your boiler is producing harmful carbon monoxide gas.
Much better to be safe than sorry.
Turn everything up full-whack
Sometimes the water heater just needs a little encouragement to get going.
Turning your hot water and radiator temperatures up to their maximum settings might just do the trick.
Check the tank
This is only for those who have an open-ended boiler but it is a common problem that, if you can reach it safely, can be rectified fairly simply.
In the cistern you’ll see ball float valve. Sometimes this can get jammed into place so check that it is moving freely. If you can get a high enough vantage point, take a look inside the cistern and check the water level too.
Check the pipework
If the weather is especially cold, you may have a frozen pipe. Running your hand along the pipework can sometimes locate the frozen area as there will be a noticeable drop in temperature, even to the touch.
Frozen pipes can cause all manner of problems so prevention is definitely better than cure in this instance. If you’re reading this instead of doing the lagging that you’ve been threatening to do for the last 6 months, shut the laptop down and take action!
We’ll be here when you get back…promise.
Turn the boiler off…then turn it on again
While this may seem more like something that a computer geek may tell you to try when your PC encounters the blue screen of death, it can – as a last resort – sometimes work with your boiler too.
When shutting off the power it’s always best to leave it for a minute or two before turning it back on again as this will give everything a chance to reset.
If all else fails…
It’s engineer time I’m afraid, but at least you’ll know that you’ve checked all the simple things and you can also let the engineer know what you’ve looked at too when you’re on the phone to them.
No.2 – Poorly performing radiators
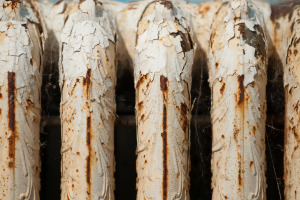
Get the most out of even the oldest radiator.
Image: DLT Photographic
Fed up with those irritating lukewarm radiators that give off less heat than your dog does? Well, it might just be something as simple as a little bit of air trapped within the old beast (the radiator, not the dog). You’ve just got to know how to let it go, so to speak.
While those who have fitted underfloor heating throughout their homes are sitting there feeling smug, there are plenty of people who still rely on the old ‘rad’ as their primary heat source and if they’re not doing what they should, it can be annoying to say the very least.
Having a radiator that is only slightly warm at the bottom and cold at the top is one of the most common central heating problems that there is.
Luckily, it’s also one of the easiest central heating problems to fix – simply follow these steps to bleed your radiator.
Step 1 – Warm it up
Firstly, run your central heating to get the system hot. Ensure that your thermostat is up high enough and that each individual radiator’s thermostat is also on their highest setting.
Heating the radiators will allow pressure to build, which will make things easier when we come to expelling the air.
Step 2 – Check for cold-spots
Once all of your radiators have had a chance to heat up, you can then go and check each one individually for problems. Be careful when doing so, some radiators can get extremely hot.
If you find that any of your radiators have cold areas around the top, you could have some trapped air in their which needs to be released.
Step 3 – Switch off the pump
Now make sure that the boiler’s pump is off before you start. To do this, just turn off your central heating at the main controls.
This is important as you do not want more air entering the system while you’re trying to get rid of what’s already there.
Not only that, leaving the pump on will result in very hot water being forced out while you fiddle around with the bleed valve – which is not good!
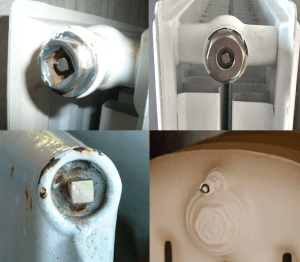
Just some of the various bleed valves your radiator might have.
Step 4 – Find the valve
The next step is to locate the bleed valve on your radiator. These can be found on the top of the radiator on either one side or the other.
What you are looking for is a small, square shaped piece of metal for your radiator key to fit over. If you haven’t got, or can’t find, a radiator key you can buy them cheaply online or from your local DIY store.
Many modern radiators will have a slot inside the square so that you can use a flat-head screwdriver for the job instead.
Step 5 – Cover up
When you’ve found the valve and have a key or screwdriver to hand, grab a couple of bits of old cloth for protection.
Lay one on the floor beneath the valve (you can use a container such as an empty ice cream tub if you’d prefer) and hold the key/screwdriver with the other.
This way, should any hot steam emit from the radiator, your hand is protected and the rag on the floor will catch any drips.
Let’s face it, central heating problems are bad enough on their own without a trip to A&E added to the mix!
Step 6 – Release the air
With everything in place, slowly and gently turn the key/screwdriver anti-clockwise to open up the valve and release the air.
If you have got some trapped inside, you’ll hear it escaping with a hissing sound as you open the valve up. It’s important to remember to open the valve slowly and carefully.
If you go to far the valve might pop out altogether and you’ll end up with a very wet floor!
Step 7 – Close the valve
Once the hissing stops and water has started to flow from the valve, it’s time to tighten up by turning the valve in the opposite direction (clockwise).
Be ready for this, the quicker you can shut off the valve, the better.
Step 8 – Repeat
Go through the above process with all radiators.
Step 9 – Pressure check
Now that all of your radiators are free from air it’s a good idea to check your pressure gauge.
Letting all of that air out of the system can cause a drop in pressure. The reading you are looking for is anywhere between 1 and 1.5 bar when the system is cold.
This will naturally rise when the central heating is on as the expanding hot water creates more pressure in the system.
Step 10 – Switch on and final check
Last, but not least, turn on your central heating and check again for any cold spots.
If they’re all gone, congratulations, you’ve just successfully bled your radiators!
No.3 – Pressure drop
As we touched upon in the section above, it’s always a good idea to check your pressure gauge after bleeding your radiators. There are other factors that can result in a drop in pressure too, with the main one being a leak somewhere in the system.
While this may sound dramatic, it can often be the tiniest of dribbles that is escaping, but over time these dribbles add up, hence the drop in pressure.
By their very nature, tiny leaks such as these are difficult to find. In the winter, the radiators are on, so the escaped water quickly evaporates from the heat of the radiator or pipework. The same applies in the summer when the air temperature is higher, small leaks do not get a chance to show themselves.
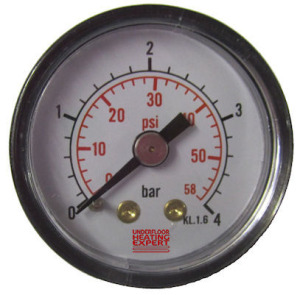 The likely areas for a leak to occur is around any joins in the system, namely the connection points for your radiators and their valves. If you’ve seen a drop in pressure and want to embark on some detective work, the best time to do so is when the system is cold.
This will allow you to have a proper feel around all of the valves and points that connect the boiler and the radiators without fear of burning yourself. If you find a spot that is slightly damper than elsewhere, it’s likely that you’ve found the culprit of your central heating problems.
Obviously, much larger leaks are a lot easier to detect, but they can also cause a lot more damage before you know about them – especially if they are hidden away.
Keeping an eye on your boiler’s pressure gauge periodically will alert you of any major changes to your system. Ideally, when the system is cold, your pressure gauge should read anywhere between 1 and 1.5 bar. The readings should never be below 0.5 or above 2.5 bar.
In order to rectify a low reading you’ll need to increase the pressure inside the system once more.
This is done by way of the filling loop that can be found somewhere near your boiler. If you still have the manual to hand, this will point you in the right direction. If not, then jot down your boilers make and model number.
A quick internet search will provide you with the contact details of the manufacturer and, in some cases, an online copy of the manual will be available. A call to the manufacturer or a flick through the manual will inform you as to where you should be looking.
While the principle is the same for all boilers, the method can vary so it’s always best to check your manual. The most common method, however, is described below:
How to add pressure to your boiler step-by-step
- Step 1 – Locate the filling loop
- Step 2 – Ensure the isolation valves are in the off position
- Step 3 – Remove the two blanking caps
- Step 4 – Attach the loop (if not already attached)
- Step 5 – Open both valves, the system will now begin to gain pressure so ensure that you have a clear view of the gauge
- Step 6 – Wait for a reading of 1 to 1.5 bar
- Step 7 – Close off the valves
- Step 8 – Disconnect the filling loop
- Step 9 – Reattach blanking caps
No.4 – Cold radiators upstairs, hot downstairs
 This is another one of those central heating problems that can leave you scratching your head. However, as with all central heating problems, it’s important not to panic, there are fixes for everything.
The first thing to try is to bleed the radiators. You’ll hear this a million times for a million different issues, but you’d be amazed at just how many central heating problems are caused by having air in the system. You can find out exactly how to bleed your radiators above.
If that doesn’t get the desired results, the next thing to check is the pump which will be located somewhere near to the boiler.
You will be able to hear and feel if it is working, but there should also be an inspection hatch on the side of the pump that will enable you to see if it’s rotating as it should be.
It could be that, after an extended period of time in the off position, it has become jammed, or it may just be that it has lost the power that it once had and can no longer move the water around the system as it should.
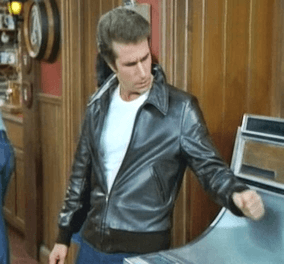
Try the Fonzie Tap.
If the pump has been off for a while, try giving it a gentle tap to see if that releases it – sometimes it’s all it needs (anyone remember the Fonz?).
If that doesn’t work, try increasing the pressure setting on the pump to get it moving. This will sometimes give it enough ‘oomph’ to get it started again, then you can lower the pressure and monitor it accordingly.
If the pump is working fine but your radiators are still cold upstairs, the water level in the feed and expansion tank could be the answer to your central heating problems.
This is often caused by a faulty float arm valve that is not allowing the tank to fill up as it should. The float arm valve works in much the same way as the ballcock in your toilet cistern does, so try pushing it down to see if the tank begins to fill. If the tank doesn’t fill when the float arm valve is pushed downward then it is most likely faulty and will need to be replaced.
Turning off all of the radiators that are working can sometimes give a quick fix. Doing so will push more pressure towards those that aren’t working. If you start to see some results and the radiators begin to warm up, try bleeding them again. Start with the radiator that is closest to the boiler and work your way round the system.
Are there any other central heating problems that you’d like us to write about? Let us know in the comments box below.
