Contents - Click a link to skip to the section you want to read
- 1 Intro
- 2 Step 1 – Preparation
- 3 Step 2 – Priming solid floors (skip to step 3 for timber floors)
- 4 Step 3 – Laying down the floor insulation boards
- 5 Step 4 – Taping up
- 6 Step 5 – Lay the membrane (for liquid screeds, skip to step 6 if using a traditional screed mix)
- 7 Step 6 – Install the expansion foam
 Intro
Intro
Proper floor insulation is vital if you want to get the most out of your underfloor heating system. Whether you have decided to opt for wet or dry UFH, having the correct floor insulation in place will help speed up warm-up times, decrease heat loss and lower energy usage.
Step 1 – Preparation
Before we can start laying down our insulation there are a few things that need to be done.
- Solid floors – Clear all dust and debris from the floor. Ensure that any sharp protrusions or major indentations are dealt with by chipping away, sanding down and filling before proceeding.
- Timber floors – Clear the floor of all dust and debris before checking for loose or uneven boards. Once clear make checks across the whole of the floor. Screw down any loose boards and make any repairs where necessary. If appropriate, a layer of plywood can be laid down to obtain a flatter finish if needed.
Check out the latest prices on the best floor insulation here
Step 2 – Priming solid floors (skip to step 3 for timber floors)
If you are laying your floor insulation boards down onto a concrete subfloor you will need to prime the floor before continuing.
You can buy thermal primers that will further insulate the floor as well as seal the concrete ready for the adhesive. Instructions for each primer will vary so simply follow the instructions on the one that you have chosen before moving on to laying down the boards.
Step 3 – Laying down the floor insulation boards
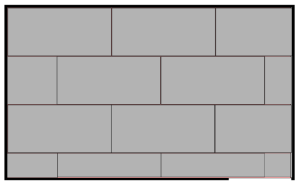
To get the best out of your floor insulation we recommend that you lay them down in a staggered fashion, as in the diagram above. Doing so will strengthen the integrity of the floor insulation and help to prevent any unevenness later on.
Cutting the boards is fairly simple and a decent cut can be achieved with a sharp craft knife. Mistakes do happen, however, so it’s best to buy a couple of extra boards, just in case. Most shops are happy to take back any that you don’t end up using so you won’t be out of pocket.
The process of securing the floor insulation boards varies depending on the type of subfloor you are working on:
- Solid floors – To be certain that your floor insulation boards are securely fixed in place we recommend laying them down on a quick-setting flexible tile adhesive. This adhesive can also be used to lay your tiles too (if you’re using them) once the screeding has been completed.
- Timber floors – Your floor insulation boards will need to be screwed into place to ensure a secure finish. Using penny or repair washers with the screws will help to spread the load evenly, preventing the board from ripping. Space all screws out at 300mm intervals across the entire board to hold it firmly in place.
Make checks with a spirit level as you go, it’s better to make any necessary corrections now rather than once the insulation is down.
Step 4 – Taping up
Using a waterproof tape, seal all of the joins in between the boards. To go the extra mile you can even run a bead of acrylic sealant along each of joins and then tape over the top of that.
This will ensure a tight seal that will help to prevent any heat loss downwards and encourage the heat from your UFH system to go in the desired direction, upwards.
Step 5 – Lay the membrane (for liquid screeds, skip to step 6 if using a traditional screed mix)
 If you intend to lay down a liquid screed you are going to need to lay down some polythene membrane to isolate the liquid when it is poured out. It’s important to take your time with this part of the process.
Make certain that the sheeting has no punctures or tears as you lay it and ensure that it goes far enough up to wall to take all of the screed. Use the waterproof tape to seal up any joins, taking lots of care around the corners of the room.
The membrane needs to be snugly fitted into each corner. Again, use the tape wherever necessary.
Step 6 – Install the expansion foam
Expansion foam (or Edge Insulation) will allow the screed (regardless of mix) a certain amount of movement, imperative for when the floor is heated. All of the best expansion foam will have a PVC apron which will lay on the floor, this can again be secured by using waterproof tape.
Unroll the expansion foam and begin securing it around the perimeter of the room. If the walls are plasterboard, a staple-gun works especially well for this. If, however, you are working with brickwork you can hold the foam in place with tape, just make sure that it is secure enough to take the screed. Once in place you can then tape down the apron to the floor.
If you intend to screed a large area then expansion joints may be necessary. Have a chat with your screed contractor and ask them what they recommend.
As soon as you have completed the above steps it’s time to move on to the fun part where the project starts to really take shape; laying the water-fed pipework or electric matting down. Good luck!
N.B. Many people are now opting for pipe trays for their pipe fixing solutions. Some of these come pre-insulated, some don’t. Nevertheless, when working with pipe trays, many fitters will prefer to use a polystyrene backed cardboard strip as opposed to the standard foam mentioned here. This particular type of expansion buffer stands up better to the trays as when they are cut, as they can leave a jagged edge which could damage unprotected foam. Well worth bearing in mind.
Why not take some pictures of your efforts and send them across to us. If we get enough we might even set up a Wall of Fame! Connect with us on social media or send us an email.