Contents - Click a link to skip to the section you want to read
- 1 Intro
- 2 Step 1 – Preparation
- 3 Step 2 – Insulation
- 4 Step 3 – Install the manifold
- 5 Step 4 – Pipe fixings
- 6 Step 5 – Laying out the pipework
- 7 Step 6 – Connecting the pipework to the manifold
- 8 Step 7 – Flushing, filling and pressurising
- 9 Step 8 – Screeding over wet underfloor heating
- 10 Step 9 – Lay down your flooring
- 11 Step 10 – Turning on and warming up!
 Intro
Intro
While many of the electric systems available are ideal for single room installations, when it comes to bigger projects wet underfloor heating is often the best choice.
Wet underfloor heating systems may take a little more planning than their electric counterparts but many feel that the effort is well worth it.
The one downside of a water-fed UFH system is the costly install. But, what if you could fit it yourself? You’d lower the cost significantly and you’d be able to enjoy cheaper bills from the moment the job is finished.
Sound good? Let’s get to it then.
Step 1 – Preparation
First things first, make sure that you have all of the necessary CAD drawings and instruction manuals to hand before you start. This guide is to give you an idea of the process, therefore it should not be used to replace any recommendations made by the manufacturer or designer.
To begin, you’ll need to identify whereabouts the manifold for the system is going to be housed. If you are installing a single room system, in a conservatory for example, you may wish to keep the manifold in the same room.
However, for larger multi-room systems, it will be necessary to run some pipework through either doorways or walls, so it’s important to know exactly where the manifold is going to be. Everything should be on your CAD drawing so refer to that if you are unsure.
If the designer’s layout suggests running the pipes through walls, now is the time to drill out the holes. Remember that you need double the holes for the amount of loops in the room – one hole for the flow, the other for the return.
Once all of the holes have been drilled out, the floors need to be thoroughly swept and made free from dust and debris. Any sharp juts or dents in a solid subfloor need to be cut away, sanded down and filled before proceeding on to laying the insulation.
For timber subfloors, ensure that all floorboards are secure and level before proceeding. You can lay down plywood sheeting to assist with this if you wish.
Step 2 – Insulation
Laying down insulation for a wet underfloor heating system is a job in itself, so to make things easier we have a separate guide showing you exactly what you need to do to get started.
If you haven’t already done so click on our insulation installation guide to find out what you need to know.
Step 3 – Install the manifold
Following the positioning on your CAD drawing, fix the manifold in place on a secure wall, ensuring that the unit is level. Manifolds are usually fitted at least 600mm from the floor so that the pipes can be easily fitted without bending when the time comes.
It is also worth bearing in mind the position of your manifold for the future. While hiding it in a corner may seem like a good idea now, when it comes to servicing you are going to want plenty of room around the unit. Ensuring easy access now could save headaches later on.
Connect the manifold to your existing water supply via the pump and the mixing valve, ensuring that the isolating taps are in the off position. If you intend to run radiators as well as your wet underfloor heating you’ll need a zone valve to give you separate control of both heating methods.
Step 4 – Pipe fixings
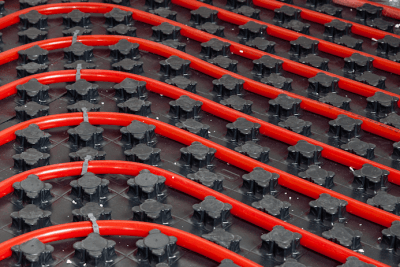
Now that your insulation and manifold are in place it’s time to get the pipework for your wet underfloor heating system laid out. In order for the pipework to stay firmly in place when screeding it is important to secure the pipes properly before the process begins.
There are many different options available for the job, including pre-insulated pipe positioning panels. These are laid out like normal insulation boards but they interconnect with each other and have a pipe fixing system built in, removing the need for clips. The most popular, however, is still the grip rail so we’ll use those here.
Lay the grip rails out at a 90° angle to how you intend to lay down the piping. Self-adhesive grip rails work well, but be sure to lay them down without removing the paper backing first. This will allow you to make sure that your positioning and spacing is correct before you finally stick them down.
You will also need a bag of staples once you start to lay down your piping.
Step 5 – Laying out the pipework
With your grip rails laid out it’s time to start putting the pipes in place. If you have had your layout designed it is important that you follow this in order to optimise your wet underfloor heating system.
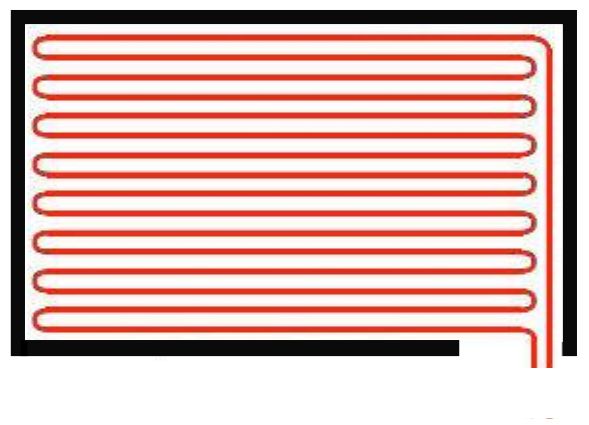
If you don’t have a custom designed layout, place the piping at approximately 200mm intervals whilst following a snake-like pattern (similar to the above diagram) to and fro, leaving enough room for the pipe to come back on itself along the wall that is by the doorway.
Click the piping into the grip rail with your feet as you go. While care should always be taken when handling the pipe, pushing down with your feet won’t cause any problems if done carefully.
This should be continued until you reach the furthest point in the room. Then you can bring the pipe down the channel that you left to complete the circuit. When starting to lay the pipe down, don’t forget to leave enough piping to get to the manifold. The same applies when finishing too, so that you can complete the loop.
While the grip rails will do a good job of holding the pipes in place on the straight runs, the bends in the pipes will need some extra attention. This is where your bag of staples come in. Specially designed for the job, these staples will hold down the pipework but won’t allow the screed to flow through into the insulation. Buy yours today here.
Even on the straight runs, if you feel that the pipework could do with a little extra help to stay put, pin them down. It’s better to be safe than sorry.
Some layouts won’t be as simple as the one above. Larger rooms will require multiple loops as the maximum length of piping for one circuit is 120 metres (many advise to limit this to 100m). If this is the case, it really is worth getting a CAD drawing made up so you can get the most efficient layout for your system.
It’s also worth remembering that each loop should be made up of one continuous length of pipe. Making joins is really just asking for trouble.
If you have multiple pipes exiting through a doorway it can create a hotspot where they are all forced together into one small space. To avoid this you can simply sleeve alternate pipes to give a degree of separation between each one as they exit the room.
Similarly, it is also important to remember to sleeve any piping that will be exiting the screed too. Failure to do so could lead to split pipes. A basic pipe conduit will do the job nicely.
Step 6 – Connecting the pipework to the manifold
Ensuring that all of the pipes ends been cleanly cut by using a pipe-cutter will make for the best fixing. Using a saw or a craft knife will leave a jagged finish – definitely not what you want when trying to create a seal. Once all of the piping is cut to the desired length you can start connecting it all to the manifold.
Take your first piece of pipe and slide your nut and compression ring over the top of the pipe. Then, whilst holding the pipe firmly, push in the hose pillar to a snug fit. Once that is in place you can push the pipe and hose pillar into the valve at the bottom of your manifold and tighten the nut.
Make sure that you continue to apply pressure until the nut is hand tight so that the pipe has been gripped properly, then finish the job with a spanner. While a good fixing is obviously important, it is equally important that you do not over-tighten the nut too. A single turn should do.
Repeat the process for all circuits, ensuring that each one is connected to both the flow and return for that particular loop.
Step 7 – Flushing, filling and pressurising
Double check that the isolating valves are off, then connect hoses to both the fill and drain point on the manifold. The fill should be connected to a mains tap, while the drain should have adequate drainage to take any excess water.
Before opening the valves on the fill and drain points, make sure that all of the circuit valves are closed. You do this by turning the decorator’s caps on your manifold clockwise until tight.
The adjustable balancing valves should be supplied in the off position, but it is worth double checking these too as it is important that we only flush one loop at a time.
Once all are shut off, open both the adjustable balancing and circuit valves on the furthest loop on the manifold. This is usually the left side of the manifold as you look at it when mounted, but check your manual if unsure. When both are in the open position you can let the water run through by opening the fill and drain valves.
This process will flush any debris out of the system as well as purge the circuit of air. Once you have a continuous flow of water from the drain outlet you can shut off that circuits valve which should immediately stop the water flowing from the drain outlet. If water continues to flow there could still be air in the system, so open up the valve and try again.
When you’re happy that the loop is free of air, shut it off and open the one next to it to repeat the same process. Continue along the manifold until all loops have been flushed and filled. Then you can close the fill and drain valves and shut off the water supply.
Now that’s out of the way we can begin to pressure test the system. Some manifolds will have a pressure gauge built in, while others will need a screw on unit (standard piece of kit available at all good plumbers’ merchants or online here).
Open all of the circuit and adjustable balancing valves by turning them anti-clockwise and attach a pressure testing pump to the fill inlet. Pump up the pressure to two bar for 10 minutes and check for any leaks or drops in pressure. If everything seems okay you can up the pressure to 10 bar and repeat the checks made previously for a further 10 minutes.
Providing all is well, the pressure can then be dropped down to 6 bar as it is now time to begin screeding the floor. The system must remain under pressure during screeding.
When you begin screeding it is worth keeping in mind that the pressure shown on the gauge will probably increase. This is due to the fact that the sand and cement mix will heat up as it cures, causing the water in the pipes to expand.
Step 8 – Screeding over wet underfloor heating
As with insulating, screeding is an important part of the process that we have given a whole guide to. Take a look if you fancy having a go at a bit of DIY screeding yourself. If not, there are lots of really good contractors who will come in and do the job for you.
If you do go down the route of hiring a contractor, make sure that you quiz them on curing and drying times as these can vary depending on the type of materials used.
Your wet underfloor heating system should not be used to speed up the drying process as this can lead to cracking and weakening of the floor.
Step 9 – Lay down your flooring
Now that the screed has had ample time to cure and dry, you can begin to lay down your flooring of choice. Whatever type of flooring you decide to go for, this stage is always the most satisfying as you can finally see the finishing line up ahead.
Step 10 – Turning on and warming up!
After patiently waiting for the screed to dry properly and having your flooring laid, you’ll be itching to get that wet underfloor heating working so you can show it off to friends and family. First, however, you’ll need to check the flow rates and introduce heat to the newly laid floor slowly.
Start off by looking at your plans for the system to find the desired flow rate. This will vary for each wet underfloor heating system so its important that you find yours and apply it as per instructions. All manifolds have different flow rate meters too, so refer to your instruction manual to check how to make these adjustments properly.
On Day 1 start off by turning the system on to its lowest setting, typically 25° to 30° and leave it at this level for 2 – 3 days. The temperature can then be slowly increased over the next few days until you reach the desired level of between 40° and 60° (dependent on flooring and subfloor type).
Once you’re up to the correct temperature, your job is complete. You can now sit back and enjoy all of the comfort and savings that a wet underfloor heating system brings.
Feel free to send us any snaps that you take while following our guide, you might just feature in our Hall of Fame! You can send your pictures to us via social media or email – we can’t wait to see them!
I’m from Russia, we often have to use infrared film floor. Do You use these? Or are they harmful?
Hi Serguy,
I’m assuming that you mean something like this product from Living Heat? If so, yes we do use them and, yes, providing they are manufactured by a reputable company, they are perfectly safe to use. In fact, they are especially recommended for use underneath laminate flooring.
Hope this helps!